reading-notes
Authentication & Production Server
JSON Web Tokens
What is JSON Web Token?
- JSON Web Token (JWT) is an open standard (RFC 7519) that defines a compact and self-contained way for securely transmitting information between parties as a JSON object. This information can be verified and trusted because it is digitally signed. JWTs can be signed using a secret (with the HMAC algorithm) or a public/private key pair using RSA or ECDSA.
- Although JWTs can be encrypted to also provide secrecy between parties, we will focus on signed tokens. Signed tokens can verify the integrity of the claims contained within it, while encrypted tokens hide those claims from other parties. When tokens are signed using public/private key pairs, the signature also certifies that only the party holding the private key is the one that signed it.
When should you use JSON Web Tokens?
Here are some scenarios where JSON Web Tokens are useful:
- Authorization: This is the most common scenario for using JWT. Once the user is logged in, each subsequent request will include the JWT, allowing the user to access routes, services, and resources that are permitted with that token. Single Sign On is a feature that widely uses JWT nowadays, because of its small overhead and its ability to be easily used across different domains.
- Information Exchange: JSON Web Tokens are a good way of securely transmitting information between parties. Because JWTs can be signed—for example, using public/private key pairs—you can be sure the senders are who they say they are. Additionally, as the signature is calculated using the header and the payload, you can also verify that the content hasn’t been tampered with.
What is the JSON Web Token structure?
In its compact form, JSON Web Tokens consist of three parts separated by dots (.), which are:
- Header
- Payload
- Signature
Therefore, a JWT typically looks like the following: xxxxx.yyyyy.zzzzz
Header
-
The header typically consists of two parts: the type of the token, which is JWT, and the signing algorithm being used, such as HMAC SHA256 or RSA. For example:
{
  "alg": "HS256",
  "typ": "JWT"
}
Payload
- The second part of the token is the payload, which contains the claims. Claims are statements about an entity (typically, the user) and additional data. There are three types of claims: registered, public, and private claims:
- Registered claims: These are a set of predefined claims which are not mandatory but recommended, to provide a set of useful, interoperable claims. Some of them are: iss (issuer), exp (expiration time), sub (subject), aud (audience), and others.
- Public claims: These can be defined at will by those using JWTs. But to avoid collisions they should be defined in the IANA JSON Web Token Registry or be defined as a URI that contains a collision resistant namespace.
-
Private claims: These are the custom claims created to share information between parties that agree on using them and are neither registered or public claims.
{
  "sub": "1234567890",
  "name": "John Doe",
  "admin": true
}
Signature
-
To create the signature part you have to take the encoded header, the encoded payload, a secret, the algorithm specified in the header, and sign that. For example if you want to use the HMAC SHA256 algorithm, the signature will be created in the following way:
HMACSHA256( base64UrlEncode(header) + "." + base64UrlEncode(payload), secret) -
The signature is used to verify the message wasn’t changed along the way, and, in the case of tokens signed with a private key, it can also verify that the sender of the JWT is who it says it is.
Putting all together
- The output is three Base64-URL strings separated by dots that can be easily passed in HTML and HTTP environments, while being more compact when compared to XML-based standards such as SAML.
- The following shows a JWT that has the previous header and payload encoded, and it is signed with a secret.

How do JSON Web Tokens work?
- In authentication, when the user successfully logs in using their credentials, a JSON Web Token will be returned. Since tokens are credentials, great care must be taken to prevent security issues. In general, you should not keep tokens longer than required.
- You also should not store sensitive session data in browser storage due to lack of security.
- Whenever the user wants to access a protected route or resource, the user agent should send the JWT, typically in the Authorization header using the Bearer schema. The content of the header should look like the following:
Authorization: Bearer <token> - This can be, in certain cases, a stateless authorization mechanism. The server’s protected routes will check for a valid JWT in the
Authorizationheader, and if it’s present, the user will be allowed to access protected resources. If the JWT contains the necessary data, the need to query the database for certain operations may be reduced, though this may not always be the case. - Note that if you send JWT tokens through HTTP headers, you should try to prevent them from getting too big. Some servers don’t accept more than 8 KB in headers. If you are trying to embed too much information in a JWT token, like by including all the user’s permissions, you may need an alternative solution, like Auth0 Fine-Grained Authorization.
- If the token is sent in the
Authorizationheader, Cross-Origin Resource Sharing (CORS) won’t be an issue as it doesn’t use cookies. - The following diagram shows how a JWT is obtained and used to access APIs or resources:
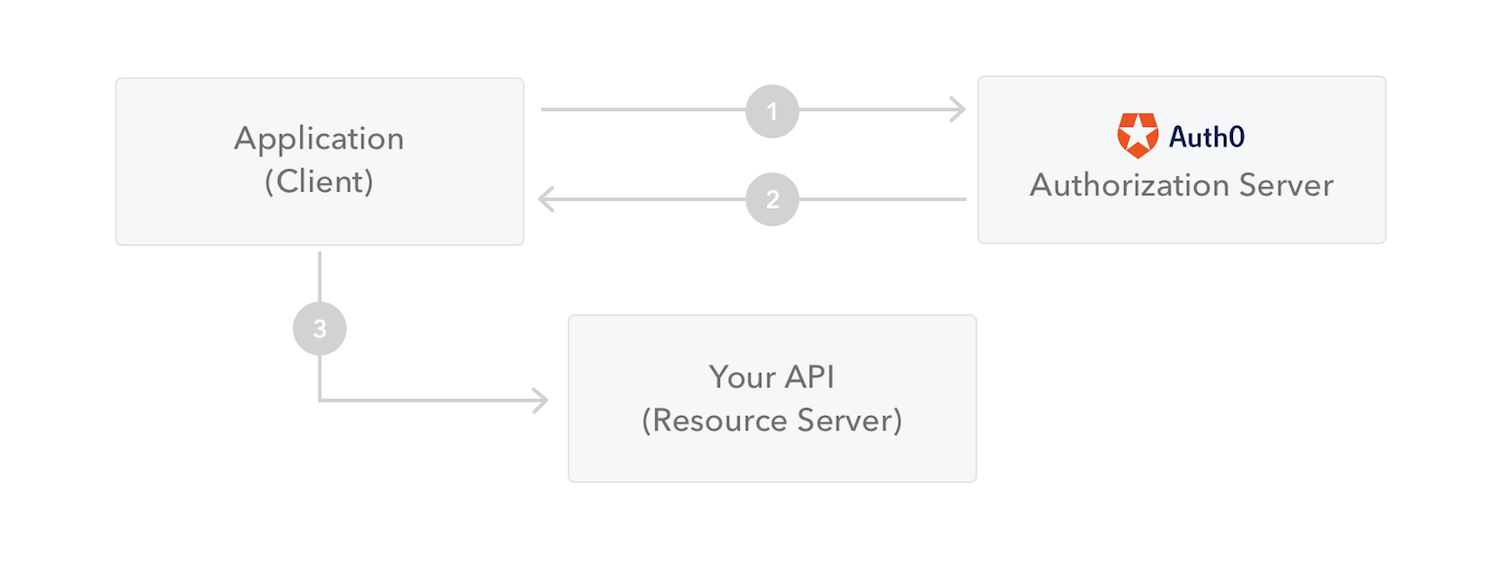
- The application or client requests authorization to the authorization server. This is performed through one of the different authorization flows. For example, a typical OpenID Connect compliant web application will go through the
/oauth/authorizeendpoint using the authorization code flow. - When the authorization is granted, the authorization server returns an access token to the application.
- The application uses the access token to access a protected resource (like an API).
- Do note that with signed tokens, all the information contained within the token is exposed to users or other parties, even though they are unable to change it. This means you should not put secret information within the token.
Source: https://jwt.io/introduction/
How to Use JWT Authentication with Django REST Framework
Installation & Setup
- For this tutorial we are going to use the
djangorestframework_simplejwtlibrary, recommended by the DRF developers:pip install djangorestframework_simplejwt. -
settings.py:REST_FRAMEWORK = { 'DEFAULT_AUTHENTICATION_CLASSES': [ 'rest_framework_simplejwt.authentication.JWTAuthentication', ], } -
urls.py:from django.urls import path from rest_framework_simplejwt import views as jwt_views urlpatterns = [ # Your URLs... path('api/token/', jwt_views.TokenObtainPairView.as_view(), name='token_obtain_pair'), path('api/token/refresh/', jwt_views.TokenRefreshView.as_view(), name='token_refresh'), ]
Obtain Token
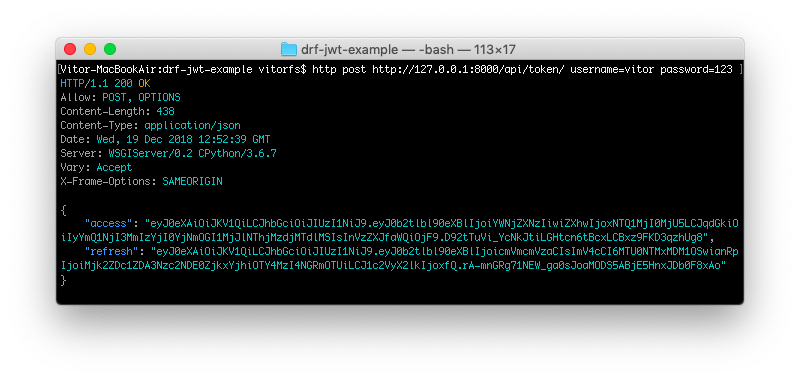
- First step is to authenticate and obtain the token. The endpoint is
/api/token/and it only accepts POST requests:http post http://127.0.0.1:8000/api/token/ username=vitor password=123
-
So basically your response body is the two tokens:
{ "access": "eyJ0eXAiOiJKV1QiLCJhbGciOiJIUzI1NiJ9.eyJ0b2tlbl90eXBlIjoiYWNjZXNzIiwiZXhwIjoxNTQ1MjI0MjU5LCJqdGkiOiIyYmQ1NjI3MmIzYjI0YjNmOGI1MjJlNThjMzdjMTdlMSIsInVzZXJfaWQiOjF9.D92tTuVi_YcNkJtiLGHtcn6tBcxLCBxz9FKD3qzhUg8", "refresh": "eyJ0eXAiOiJKV1QiLCJhbGciOiJIUzI1NiJ9.eyJ0b2tlbl90eXBlIjoicmVmcmVzaCIsImV4cCI6MTU0NTMxMDM1OSwianRpIjoiMjk2ZDc1ZDA3Nzc2NDE0ZjkxYjhiOTY4MzI4NGRmOTUiLCJ1c2VyX2lkIjoxfQ.rA-mnGRg71NEW_ga0sJoaMODS5ABjE5HnxJDb0F8xAo" } - After that you are going to store both the access token and the refresh token on the client side, usually in the localStorage.
- In order to access the protected views on the backend (i.e., the API endpoints that require authentication), you should include the access token in the header of all requests, like this:
http http://127.0.0.1:8000/hello/ "Authorization: Bearer eyJ0eXAiOiJKV1QiLCJhbGciOiJIUzI1NiJ9.eyJ0b2tlbl90eXBlIjoiYWNjZXNzIiwiZXhwIjoxNTQ1MjI0MjAwLCJqdGkiOiJlMGQxZDY2MjE5ODc0ZTY3OWY0NjM0ZWU2NTQ2YTIwMCIsInVzZXJfaWQiOjF9.9eHat3CvRQYnb5EdcgYFzUyMobXzxlAVh_IAgqyvzCE"
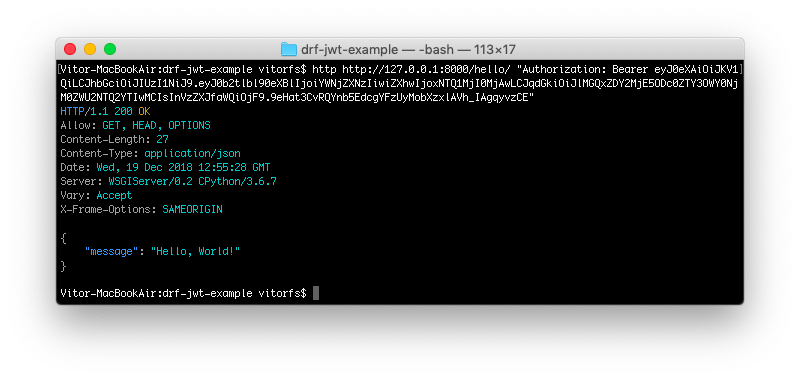
- You can use this access token for the next five minutes.
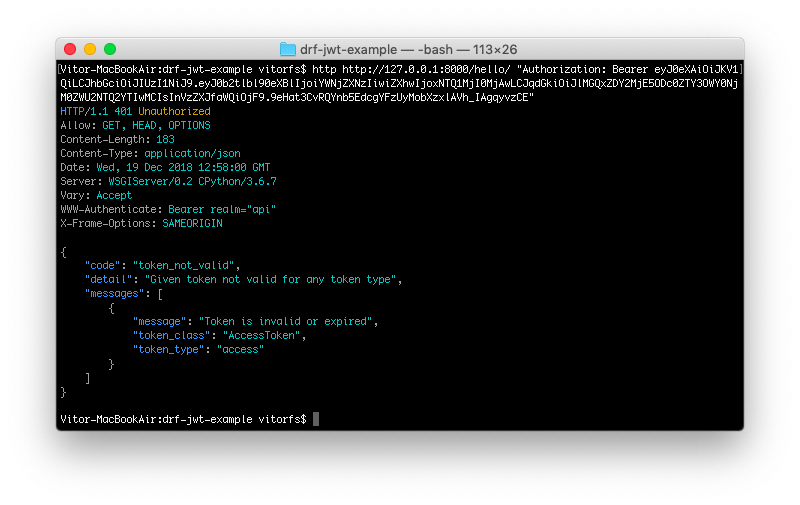
- After five min, the token will expire, and if you try to access the view again, you are going to get the following error:
http http://127.0.0.1:8000/hello/ "Authorization: Bearer eyJ0eXAiOiJKV1QiLCJhbGciOiJIUzI1NiJ9.eyJ0b2tlbl90eXBlIjoiYWNjZXNzIiwiZXhwIjoxNTQ1MjI0MjAwLCJqdGkiOiJlMGQxZDY2MjE5ODc0ZTY3OWY0NjM0ZWU2NTQ2YTIwMCIsInVzZXJfaWQiOjF9.9eHat3CvRQYnb5EdcgYFzUyMobXzxlAVh_IAgqyvzCE"
Refresh Token
- To get a new access token, you should use the refresh token endpoint
/api/token/refresh/posting the refresh token:http post http://127.0.0.1:8000/api/token/refresh/ refresh=eyJ0eXAiOiJKV1QiLCJhbGciOiJIUzI1NiJ9.eyJ0b2tlbl90eXBlIjoicmVmcmVzaCIsImV4cCI6MTU0NTMwODIyMiwianRpIjoiNzAyOGFlNjc0ZTdjNDZlMDlmMzUwYjg3MjU1NGUxODQiLCJ1c2VyX2lkIjoxfQ.Md8AO3dDrQBvWYWeZsd_A1J39z6b6HEwWIUZ7ilOiPE
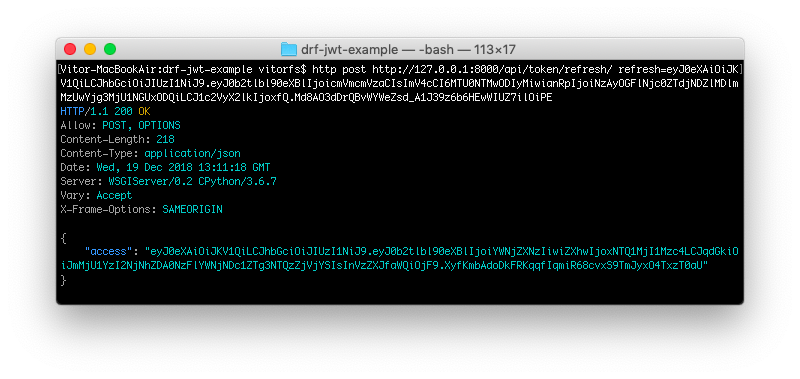
- The return is a new access token that you should use in the subsequent requests.
- The refresh token is valid for the next 24 hours. When it finally expires too, the user will need to perform a full authentication again using their username and password to get a new set of access token + refresh token.
Django Runserver Is Not Your Production Server
- DO NOT USE THIS SERVER IN A PRODUCTION SETTING. It has not gone through security audits or performance tests.
- If you want to run Django in production, be sure to use a production-ready web server like Nginx, and let your app be handled by a WSGI application server like Gunicorn.
- If you plan on running on Heroku, a web server is provided implicitly. You don’t have to take care of it. You just need to specify a command to run your application server (again, Gunicorn is fine) in the Procfile.
Source: https://vsupalov.com/django-runserver-in-production/
Things I Want To Know More About
- This used in a project.